
Did you know iPhones don’t have a built-in call recording feature, unlike Android phones? But don’t worry! Whether recording a vital business conversation or trying to capture a precious moment with a loved one, there are several effective ways to record phone calls on your iPhone. I’ll walk you through all your options, from free built-in solutions to professional recording apps. Just remember – always get consent before recording any conversation! Now let’s learn How to Record a Phone Call on iPhone.
Legal Considerations Before Recording Phone Calls
Let me tell you something I learned the hard way – recording phone calls isn’t as straightforward as hitting that red button! Back when I first started recording client calls for my small tutoring business, I had no idea about consent laws. Boy, was that a wake-up call (pun intended!).
Here’s the deal: in the United States, we’ve got this patchwork of federal and state laws about call recording. The federal law says at least one person on the call needs to know it’s being recorded – that’s called one-party consent. But here’s where it gets tricky – some states require everyone on the call to know they’re being recorded. These are called two-party consent states, even though there might be more than two people on the call.
I remember this one time, I was recording a call with a client who was in California (a two-party consent state), while I was in New York (a one-party consent state). I thought I was covered by New York law, but nope! You’ve gotta follow the stricter state’s laws when calls cross state lines. That could’ve been a messy situation.
Let’s break down what you need to do to stay on the right side of the law:
First things first, always, and I mean ALWAYS, start your call with something like, “Hey, just so you know, I’m recording this call for quality/reference purposes. Is that okay with you?” Get their verbal consent and make sure it’s recorded too. Trust me, this has saved my bacon more than once!
The consequences of not following these laws? They’re no joke. You could be looking at fines, civil lawsuits, or in some extreme cases, criminal charges. Plus, any recordings made illegally usually can’t be used as evidence in court – learned that one from my lawyer friend over coffee!
Pro tip: I keep a little cheat sheet of state recording laws in my phone’s Notes app. It might seem like overkill, but it’s better than accidentally breaking the law, right? And if you’re dealing with international calls? Whew, that’s a whole other ball game – some countries have super strict privacy laws about recording calls.
You know what’s wild? Some states even have different rules for in-person conversations versus phone calls. And don’t get me started on video calls – they’re technically covered under these laws too, but the technology has evolved faster than the legislation.
The most important thing I’ve learned after years of recording calls is this: when in doubt, just ask for permission. It’s way better to have an slightly awkward moment at the start of your call than to deal with legal headaches later. Besides, most people are totally cool with it if you explain why you’re recording.
Using Google Voice for Free Call Recording
Okay, let me share my Google Voice journey – it’s been quite the ride! I discovered this gem about five years ago when I was trying to find a free way to record my students’ pronunciation practice sessions. Google Voice has honestly been a game-changer, though it took me some time to figure out all its quirks.
First up, you’ll need to set up a Google Voice account if you haven’t already. Head over to voice.google.com and follow the setup process. Here’s a tip I wish someone had told me earlier – pick a number in your local area code if possible. I initially chose one from a different state because I thought it didn’t matter, and ended up confusing some of my contacts!
The recording feature is pretty straightforward, but there’s a catch (isn’t there always?). You can only record incoming calls, not outgoing ones. I learned this the hard way when I tried to record an important client call I had initiated – total fail! The workaround I’ve found is to ask people to call my Google Voice number instead of me calling them.
To enable call recording:
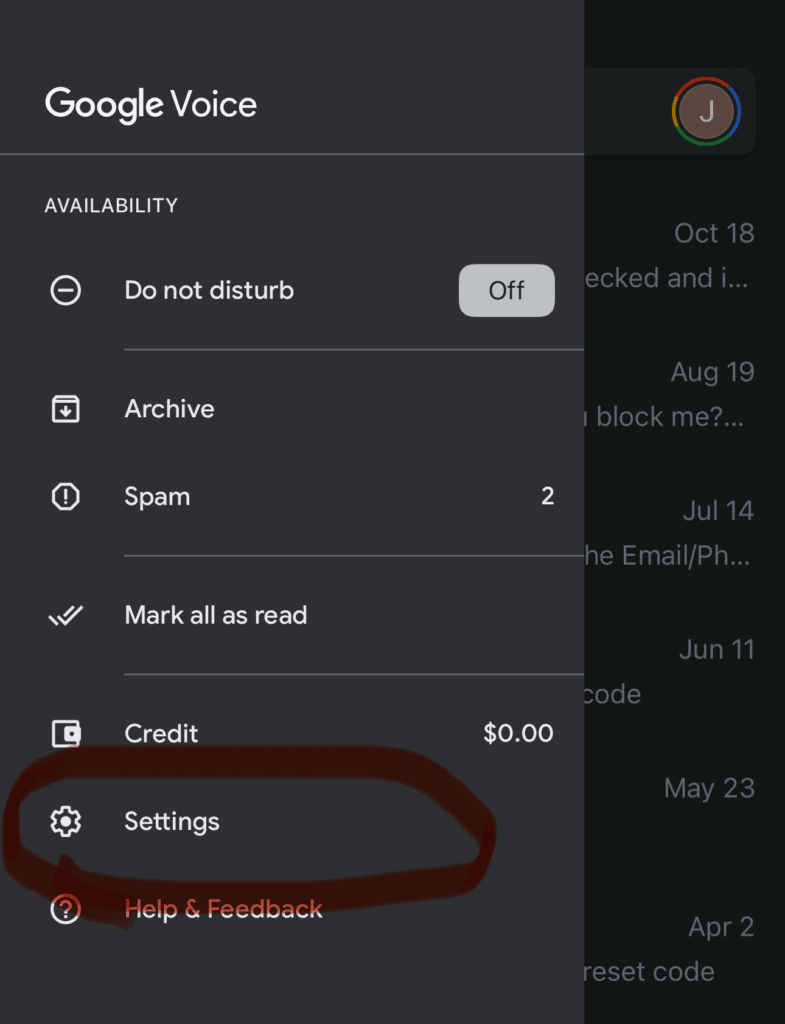
- Log into your Google Voice account
- Click the gear icon (Settings)
- Go to the “Calls” Heading
- Toggle on “Incoming call options”

Here’s a cool trick I discovered by accident – when you want to record a call, wait for the person to call you, then press ‘4’ on your keypad. Both parties will hear a voice announcement that recording has started. To stop recording, either press ‘4’ again or just hang up. The recording automatically saves to your Google Voice account – how neat is that?
But let me tell you about some quirks I’ve noticed. Sometimes the audio quality can be a bit wonky, especially if you’re in an area with spotty service. I’ve found that using Wi-Fi calling can help with this. Also, don’t freak out if you don’t see your recording right away – it can take a few minutes to show up in your account.
One time, I was recording a super important interview and totally forgot to check my Google Voice storage space. Halfway through the call, the recording stopped because I had hit the storage limit! Now I make it a habit to clean out my old recordings every month. Trust me, you don’t want to learn this lesson the hard way like I did.
The best part about Google Voice recording? It’s totally free! But remember, you get what you pay for. If you’re doing professional work or need higher quality recordings, you might want to look at some paid options. Still, for basic call recording needs, it’s pretty solid.
How to Record a Phone Call on iPhone: Third-Party Call Recording Apps

Let me tell you about my adventures testing call recording apps – and believe me, I’ve tried them ALL! After spending way too much money on apps that promised the moon and delivered, well, let’s just say less than stellar results, I’ve finally figured out which ones actually work.
TapeACall Pro has been my go-to for the past couple years. I remember the day I discovered it – I was desperately trying to record an interview with a famous chef for my food blog (side hobby, don’t judge!). After three failed attempts with other apps, TapeACall Pro actually worked like a charm. Here’s the thing though – it works a bit differently than you might expect.
Instead of just hitting a record button during your call, you actually have to merge your call with the app’s recording line. Sounds complicated? I thought so too at first! The first time I tried it, I accidentally hung up on my interviewee – talk about embarrassing! But once you get the hang of it, it’s pretty straightforward. Here’s my foolproof method:
- Start your call like normal
- Hit the merge call button (this puts your first call on hold)
- Dial TapeACall through the app
- Merge the calls together
- Boom! You’re recording
Now, let’s talk about Rev Call Recorder – another solid option I’ve used extensively. The thing I absolutely LOVE about Rev is its transcription service. Sure, it costs extra, but man, having your recorded calls automatically transcribed is a game-changer! I used to spend hours transcribing interviews manually – never again!
One thing that initially drove me nuts was figuring out these apps’ pricing structures. Some have monthly subscriptions, others charge per recording, and a few try to rope you in with “free” versions that are basically useless. After much trial and error (and some regrettable subscription charges), here’s what I’ve learned:
The free versions usually have deal-breaking limitations like:
- Super short recording times (usually 1-2 minutes)
- Terrible audio quality
- No way to export your recordings
- Annoying ads that pop up at the worst moments
It’s worth paying for a premium version – trust me on this one! I wasted so much time trying to piece together multiple short recordings from a free app before finally biting the bullet and paying for a proper solution.
Speaking of security (because we should totally talk about that), make sure you read the privacy policies of these apps. Some of them store your recordings on their servers, which might not be ideal if you’re recording sensitive conversations. I learned this lesson when one of my recordings showed up in someone else’s app – talk about a privacy nightmare! Now I always check where my recordings are stored and how they are protected.
Pro tip that took me way too long to figure out: Most of these apps work better if you set them up BEFORE you need them. Nothing’s worse than figuring out how to use a new app while your important call is waiting! I usually do a test recording with a friend before any crucial calls.
Oh, and here’s something I wish someone had told me earlier – keep your apps updated! I once lost an entire recording because I ran an outdated version incompatible with the latest iOS update. Now I obsessively check for updates the night before any important calls.
Recording Calls Using Another Device
Let me share a little secret – sometimes the simplest solution is the best one! When all my fancy apps failed me one day before a crucial interview, I discovered what I now call the “old school method.” And honestly? It’s become my backup plan for everything!
You know what’s funny? I actually stumbled upon this method by accident. My recording app crashed right before an important client call, and in a panic, I grabbed my kid’s iPad and opened Voice Memos. Not exactly professional, but guess what? It worked surprisingly well! Here’s how I’ve refined the process since that day of desperate improvisation:
First, let’s talk about the speakerphone method. It’s pretty straightforward:
- Put your iPhone call on speaker
- Grab another device (could be an iPad, another phone, or even a good old digital recorder)
- Open the recording app (I love Voice Memos because it’s already there on Apple devices)
- Place the recording device about 6-8 inches from your iPhone
- Hit record and you’re good to go!
But wait – there’s definitely some tricks I’ve learned the hard way! The first time I tried this, I had my air conditioner blasting in the background. Big mistake! The recording picked up more of my AC’s dramatic performance than the actual conversation. Now I always find a quiet room – and I mean really quiet. It’s amazing how much background noise we usually tune out until we’re trying to record something!
Let’s talk about positioning, because this is crucial. Through lots of trial and error (and some hilariously bad recordings), I’ve found the sweet spot for placement:
- Keep your iPhone on a soft surface (I use a mousepad to absorb vibrations)
- Place the recording device on a stable surface (not in your hand – learned that one the hard way!)
- Make sure both devices are plugged in or fully charged (nothing worse than dying mid-recording)
- Test the audio levels before your important call
Here’s a pro tip that took me forever to figure out: if you’re using an external microphone (which I totally recommend for important stuff), get one of those little lapel mics. They’re super cheap on Amazon and make a HUGE difference in audio quality. I use one that clips right onto my shirt – it picks up my voice crystal clear while minimizing background noise.
Oh man, let me tell you about the time I was recording a super important business call and my dog decided it was the perfect moment to start barking at the mailman! Now I always have a “recording in progress” sign on my door (and some treats ready for the furry interruption machine).
One thing that really surprised me was how much phone position matters. Holding the phone too close to your mouth while on speaker? That’s a recipe for distortion. Too far away? The other person sounds like they’re talking from the bottom of a well. I’ve found that holding the phone at about chest level, slightly angled up, gives the best results.
And here’s something nobody tells you – always do a test recording first! Seriously, take 30 seconds to record yourself counting to ten and play it back. You’d be amazed how many times this simple step has saved me from recording an entire conversation only to find out it was barely audible.
The best part about this method? No app crashes, no weird merging calls, no subscription fees. Just straightforward recording that always works. Sure, it might not be the most elegant solution, but sometimes reliable beats fancy!
Professional Solutions for Business Users

Let me tell you about my journey into the world of professional call recording – it’s a whole different ball game from the basic methods we’ve discussed! After my small tutoring business grew into a full-fledged training company, I quickly realized I needed something more robust than my DIY recording solutions.
First off, let’s talk about cloud-based recording services. I remember the day I finally bit the bullet and invested in a proper cloud recording system – it felt like stepping into the future! No more juggling apps or worrying about storage space. These services integrate directly with your business phone system, and let me tell you, it’s like having a personal recording assistant.
The game-changer for me was discovering RingCentral. Here’s what happened: I was struggling to record a crucial training session with multiple participants when my regular recording app crashed (of course it did!). After that disaster, I decided to explore professional options. While the monthly cost initially made me wince – I’m talking $30-50 per user per month – the features absolutely justified the investment:
- Automatic recording of every call (if you want)
- Crystal clear audio quality (goodbye, speakerphone interference!)
- Unlimited storage with automatic backup
- Easy sharing and collaboration features
- Built-in transcription services (this alone saved me hours of work)
But here’s something nobody told me about professional recording hardware – it’s not just about the recording quality! I invested in a fancy recording interface for my iPhone, thinking it would solve all my problems. Turned out, the real value was in the software ecosystem that came with it. These systems often include:
- Call analytics and tracking
- Integration with CRM systems
- Automated compliance announcements
- Quality monitoring tools
- Advanced search and categorization features
Speaking of hardware, let me share a costly mistake I made. I initially bought the cheapest business recording system I could find – big mistake! It worked fine for basic calls, but when I needed to record a conference call with international clients, the quality was so poor we had to reschedule the entire meeting. Now I always tell people: if you’re serious about business recording, invest in quality equipment from the start.
Here’s my current setup, which I wish I’d known about from day one:
- A professional VoIP phone system with built-in recording capabilities
- Cloud storage with automatic backups (learned this one after losing some important recordings!)
- A dedicated backup recording solution (because redundancy is your friend)
- Quality monitoring software for training purposes
Let’s talk ROI because this was huge for me. Initially, I couldn’t justify spending thousands on a professional recording setup. But then I did the math:
- Time saved not dealing with technical issues: ~2 hours per week
- Improved client satisfaction due to better quality: priceless
- Reduced liability thanks to proper compliance features: worth every penny
- Training efficiency increased by about 40%
Pro tip that saved my business thousands: many providers offer significant discounts if you prepay annually. I negotiated a 30% discount by signing an annual contract and referring two other businesses to my provider.
One thing that really surprised me about professional solutions was the analytics. I had no idea how valuable call metadata could be! Now I can track things like:
- Peak calling hours
- Average call duration
- Most active users
- Common discussion topics (through AI transcription)
- Quality metrics
Here’s a funny story – I once recorded an entire week of calls with the audio channels reversed (my voice was on the client channel and vice versa). Now I always run a test call after any system updates. It’s become part of my Monday morning routine, right after my coffee!
The bottom line? If you’re running a serious business where call recording is crucial, professional solutions are worth every penny. Yes, they’re more expensive than basic apps or DIY solutions, but the reliability, features, and peace of mind are invaluable. Plus, many of these costs are tax-deductible (consult your accountant – learned that one late in the game!).
Remember this: your recording system should grow with your business. Start with what you can afford, but don’t be afraid to upgrade as your needs evolve. Your future self will thank you!
Conclusion
While iPhones don’t offer native call recording, you now have several reliable methods. Remember always to prioritize legal compliance and clear consent when recording calls. Whether you opt for a free solution like Google Voice or invest in a professional recording app, test your chosen method before any important calls. Have you tried any of these recording methods? Let us know your experience in the comments below! Keep up to date with us at Jlbellconsulting.com